To do a Nano Banana face swap, upload two photos and give each one a clear job: Image 1 supplies the face, while Image 2 supplies the scene, body, clothing, and pose. Ask to edit Image 2 only, then list everything that must stay in place.
You can swap faces with Nano Banana by combining reference images with editing instructions in the generator. This tutorial walks through the two-photo setup, provides a copyable keep-list prompt, and uses before-and-after examples to show what to inspect. It also explains how one added sentence can improve an awkward transition between the face and neck.
How to Swap Faces with Nano Banana
Start with two images whose faces are easy to read. For the donor, choose a sharp portrait with visible eyes, nose, lips, and jaw. A near-frontal angle makes the reference easier to describe. For the scene photo, choose the composition you want to keep, including the person's head angle and expression.

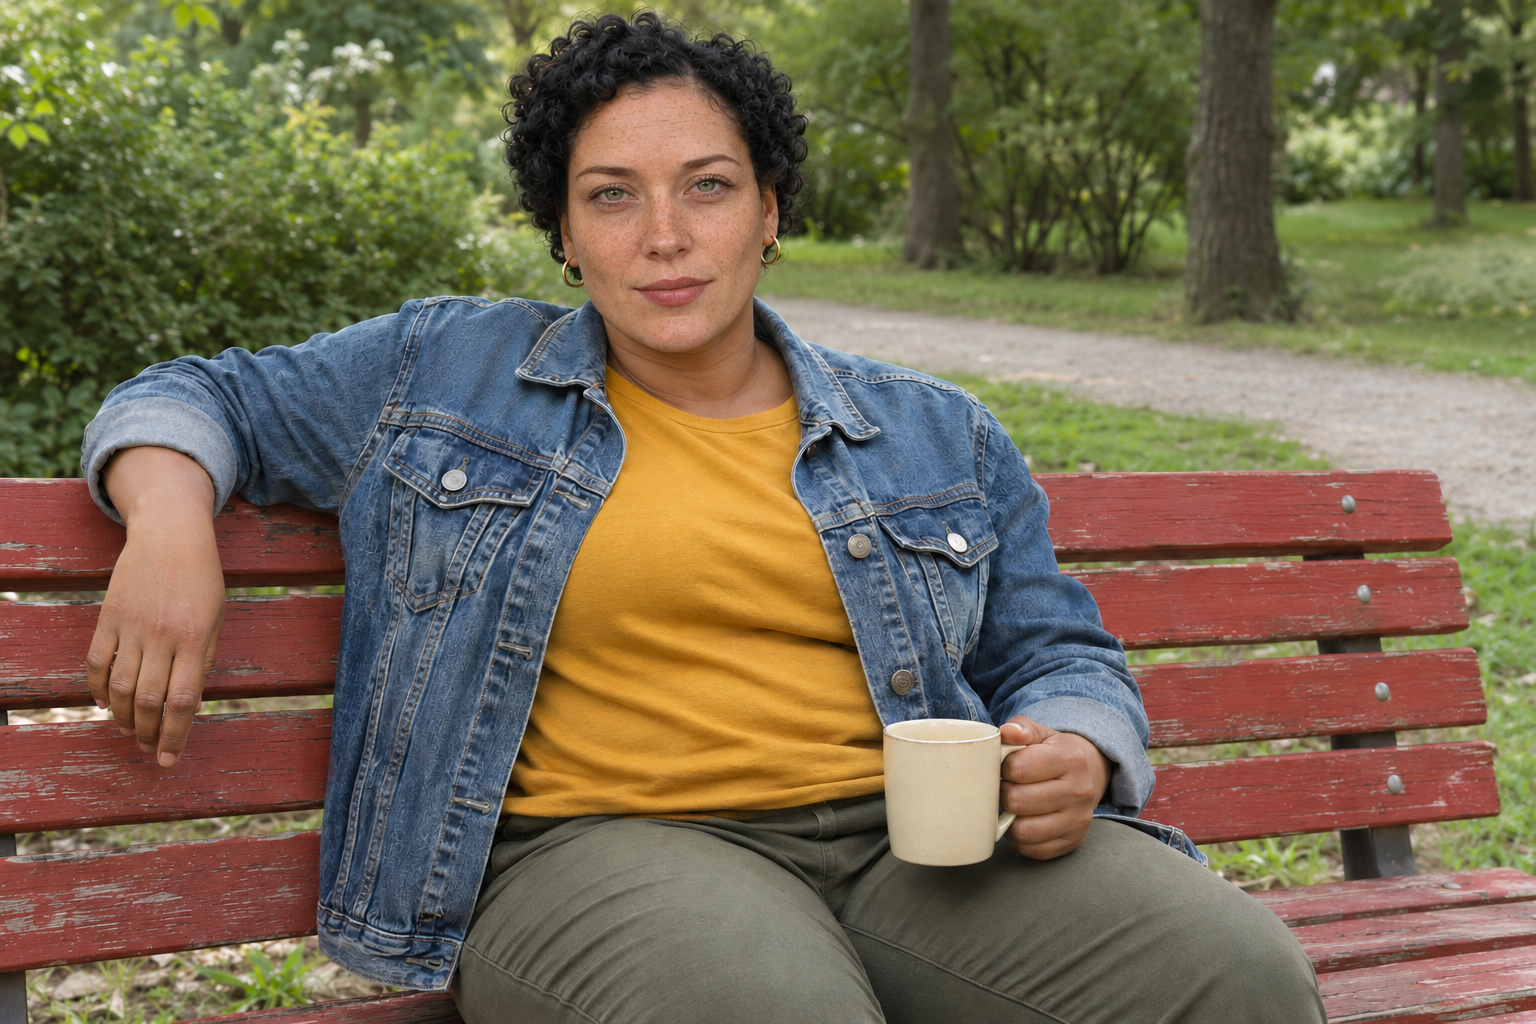
Upload the donor as Image 1 and the scene as Image 2. In this example, A is the portrait above; B is the park-bench photograph shown below. Edit Image 2 using the facial identity from Image 1.
Use the next section's template, replacing its details to match your photos. Generate the edit and compare it with both originals: use A to check identity and B to check the scene. Keep those same two source files for any revised attempt so each change addresses a specific problem.
Nano Banana Face Swap Prompt
Upload the donor portrait as Image 1 and the scene photo as Image 2. Copy the prompt below, replacing the filenames and visual details to match your photos.
Image 1 (source-face-a.png) is the facial identity reference. Image 2 (source-scene-b.png) is the photograph to edit.
Edit Image 2 only. Replace the person's facial identity with the identity from Image 1: recognizable eye shape and pale green irises, slender nose, lip shape, cheek and chin structure, and freckles. Fit these features to Image 2's existing head size and angle. Preserve its head position, gaze and calm closed-mouth expression.
Keep unchanged: Image 2's short black curls, hairstyle, hairline, ears, earrings, neck, body, hands, seated pose, denim jacket with its buttons and seams, mustard T-shirt with its folds, olive trousers, cream mug, red bench, park background, camera viewpoint, horizontal framing, depth of field, exposure and light direction. Do not bring over Image 1's auburn hair, burgundy shirt or studio background.
Blend: Match the edited face's lighting, white balance and skin tone to Image 2's existing neck and ears. Preserve the original neck and body skin tone. Retain the reference person's identity features, freckles, pores and natural skin texture, with natural transitions at the jaw and hairline.
Return one complete photorealistic photograph with the same dimensions and composition as Image 2. Limit changes to the facial region. Do not add people, text, labels, logos or watermarks. Avoid beauty retouching and collage layouts.
“Swap the faces” leaves the transfer direction and editing boundary unclear. Replace the template's visual details with features you can identify in your own photos, then use the examples below to assess the result.
Face Swap Examples: Before and After
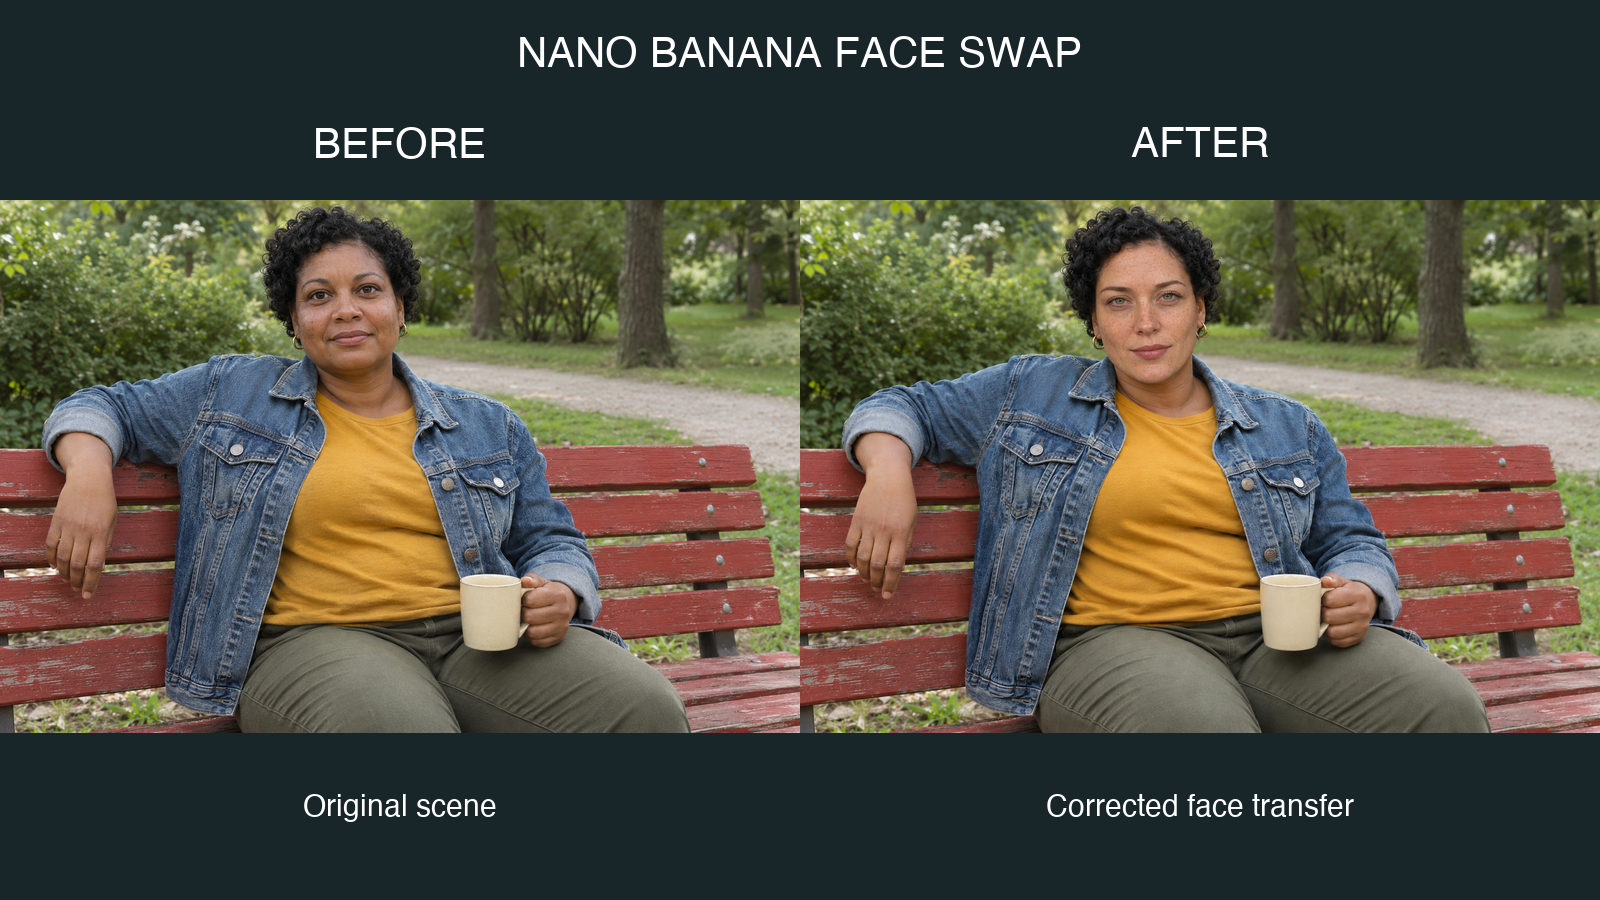
Look first at the scene photo. B has short black curls, round dark eyes, a broad nose, and a rounded face. The arm along the bench, mug above the lap, and open jacket make useful reference points for checking the edit.

Now compare the keep-list result. The eyes are greener and more almond-shaped, the nose is narrower, and the freckles and lip shape bring A's identity into the photograph. The scene's hair, outfit, props and framing remain recognizable.

Check the result at two scales. At normal viewing size, assess whether the person reads as A in B's composition. Then zoom in to inspect the eyelids, nostrils, mouth corners, hairline, and jaw. Compare the neck and collar with the original scene as well: a convincing face can still need a more careful blend below the chin.
How to Fix Face Swap Problems
The short-prompt example shows a useful distinction between transferring identity and finishing the blend. A's features are present, and the park setting remains recognizable, but the pale facial skin meets a darker neck abruptly. The short instruction also leaves changes around the shirt collar and folds unaddressed.

For this problem, append the following sentence to the full keep-list prompt. It directs the face to adapt to the scene's existing skin tone and identifies the area outside the face that should be preserved.
Targeted correction: Preserve every part of Image 2 outside the facial skin region bounded by the existing hairline, ears and chin, including the original medium-brown neck, ears, arms and hands; match the donor facial skin to that existing skin tone instead of lightening the neck or body, and keep all clothing folds, seams, background details and object positions fixed.
Use the original A and B images again with that revised prompt. This keeps the comparison focused on the new instruction instead of carrying earlier changes into another edit.
If the face looks oversized, specify that its features must fit the existing head size and angle. If the donor's hairstyle appears, reinforce the scene photo's hairline and hair. If skin looks too smooth, retain pores and natural texture in the blending instruction. Change the instruction that matches the visible issue, then review that area alongside the whole photograph.
How to Keep the Original Photo Unchanged
Compare the result with Image 2 in three passes. First, check the silhouette and framing: align the head and shoulders with the original and look for shifts in the crop or pose. Next, inspect the neckline, seams and shirt folds. Check fabric details separately even when the pose looks unchanged. Finally, compare the hands, mug and background edges for altered shapes or positions.
If a detail has shifted, name that exact feature in the next instruction and rerun from the original images. Compare the new result with Image 2 again, checking whether the correction helped and whether another area changed. The examples show why a recognizable outfit still needs this closer inspection.
Use these checks to review your next Nano Banana face swap result before saving it.
Face Swap vs. Character Consistency
Face swapping transfers a reference person's facial identity into an existing photograph while preserving the target composition.
Character consistency starts with one identity you want to carry through multiple edits. You might keep the same face while changing clothes, location, or pose across a series. For that workflow, read How Nano Banana Keeps the Same Face While You Edit.
Choose face swapping when you want to place a reference person's facial identity into an existing photograph. Choose character consistency when you want the same person to remain recognizable across new scenes, outfits or poses.